The Girt (Legacy) Edit window ( Modeling )
- This window's counterpart -- for a non-legacy girt -- is described here .
- If you are editing one legacy girt, its member number (" Member xx ") is shown in the title bar, and the "
 Summary " lists other girts with the same piecemark.
- Girt (Legacy) Edit - Multiple Members is this window's title if you are editing multiple girts .
- This window is mostly read-only (titled Girt (Legacy) Review ) if the " Model complete date " is set and ' Restrictive ' is selected for any girt being edited.
-
 " Copy " " Paste " " Save " " Load " buttons (form buttons) are embedded in the headers for individual leaves on this window. They apply to the settings that are contained in that leaf. Some form buttons, such as those for [ Left end settings ], apply to multiple leaves. Click here for more information. " Paste " and " Load " replace mixed entries to a single field with a single entry. " Copy " and " Save " ignore fields with mixed entries, treating them as if they have no entry or do not exist. Form buttons above sections that have multiple subordinate sections under them -- e.g., [ Left end settings ] or [ Right end settings ] -- operate on settings under all of the subordinate sections. For example, if you wanted to copy a connection from the left end to the right end, you would use the " Copy " button under [ Left end settings ] then use the " Paste " button under [ Right end settings ]. Special cases: Form buttons do not operate on " Piecemark " and " End elevation ."
- " Save " (
 ) places a file (which you name) in a subfolder of the
  form/girt folder that is used by your current version of this program -- the exact subfolder depends on where the button is located. " Load " (
  ) takes you to that same folder.
- To add a girt, see the step-by-step instructions .
To open this window :
- Add Legacy Girt
- Double-click girt main material in Select Items mode
- "Edit..." on context menu, select girt piecemark
- Double-click girt[num] in Model Tree
- Edit Member (to edit one girt or all girts with the same piecemark)
- Edit multiple girts (only girts can be selected)
- Edit by Piecemark
- Edit by Member Number
- Add Member
- Search Options
Also see :
- Member lines (girt representation in stick)
- Automatically process after modeling operation ( User and Site Options > Modeling > )
- Member Copy (alternative to Add Girt )
- Move/Stretch Members (to stretch/move an added girt)
- Move/Stretch Members, Include Material (same as Move/Stretch Members , but often better)
- Erase Member (undoes an Add Girt )
- Constructing the 3D model (topic)
- Grayed out fields (indicate mixed entries or that the field is disabled)
 Add Legacy Girt (step-by-step instructions)
Add Legacy Girt can be used to add girts to the 3D model . The points you lay out using Add Girt designate the work line of the girt, which is drawn along the top flange of the girt. In Detail Members and member isolation , main views for girts are generated so as to be looking straight down at the top web. After you have added one girt, you can add another girt with the same settings by clicking Repeat (middle-click) while the point-location target ( ![]() ) is where you want the newest girt's first point. The following instructions assume that you are using a 3-button mouse.
) is where you want the newest girt's first point. The following instructions assume that you are using a 3-button mouse.
| Tip: To add a non-legacy girt, click here . |
1 . Before adding the girt(s):
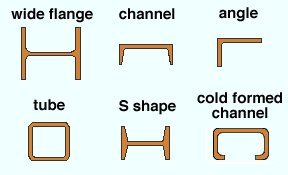
1a : Open ( Ctrl + o ) the view in which you want to add the girt(s). Please note that the workline runs along the center of the top flange of a wide flange or S shape or tube girt. It runs along the outside corner of an angle, the outside corner of the top flange of a channel or cold formed channel.
1b : Lay out grid lines or construction lines so that there are points of intersection ( INCL points) wherever you want to place the work points of the girt(s) you are adding.
1c : For work points added using INCL with Offset Controls set to offsets of zero, the elevation of the work points is the elevation of the plan view in which the girt is added.
2 . Invoke Add Legacy Girt using any one (1) of the following methods:
▸ Choose Model > Member > Add > Girt (Legacy) .
▸ On your toolbar, click the icon pictured above .
▸ Use a keyboard shortcut .
▸ With Member Mode mouse bindings active, middle-click ( Add ). On the selection dialog that opens, double-click " Girt. "
3 . Locate - Repeat - Return mouse bindings become active. This is the step where you define the girt's work points. You may want to locate these work points in space, rather than to a member, since system connections on girts are currently not supported.
|
|
|
bindings |
3a : Select a Locate option (e.g. INCL ), then move your mouse pointer (
) so that the point location target (
) snaps to where you want the work point. Left-click ( Locate ).
3b : The status line prompts, "Locate second point:" Move your mouse pointer (
Note 1: Together the two points you just added define the workline of the girt. Girt worklines (stick form member lines) are drawn across the top flange center line of a wide flange or S shape or tube girt. For a channel or cold formed channel girt, the workline is along the heel of the top flange of the channel. For an angle girt, the workline is drawn along the outside corner of the angle.
4 . The Girt (Legacy) Edit window opens. On it are setting for the girt whose work points you defined in step 2.
Alternative 1 : Edit the girt's settings as desired (see the notes below), then press the " OK " button. Go to step 5.
Alternative 2 : Press the " Cancel " button to close this window and go back to step 3.
Note 1: The number of degrees of " Girt rotation " that you enter directly affects the orientation of the girt in space. If you enter -90 degrees for a girt added in a plan view, the girt's near side is face up in that plan view.
5 . The member workline of the girt you just added appears on screen in stick form . If User and Site Options > Modeling > " Automatically process after modeling operation " is ' Process and create solids ', the new girt will have automatically undergone all phases of Process and Create Solids . If that option is ' Process ' or ' Do nothing ', you will have to Process > Process and Create Solids in order to have the member piecemarked and able to be displayed in a solid form . Do one (1) of the following:
Alternative 1 : Move the mouse pointer (
Alternative 2 : Follow these instructions beginning with step 3 to add a girt with different settings than the one you just laid out.
Alternative 3 : Right-click ( Return ) if you are done laying out girts.
|
|||||
|
|
||||
Section size: This girts's main material (e.g., ' W12x45 ').
|
To enter a section size: You can type in the section size that you want, or you can press the "file cabinet" browse button (
) and double-click any section that is on the list of available materials in the local shape file . Validation only lets you enter a material that is listed in the local shape file. Also, if you enter a section size that is not available , validation brings up a yes-no dialog with the warning, " The section size is not available from suppliers. Are you sure you want to use it? "
Note: Girt work lines (stick form member lines) are drawn across the top flange center line of a wide flange or S shape or tube girt. For a channel or cold formed channel girt, the workline is along the heel of the top flange of the channel. For an angle girt, the workline runs along the outside corner of the angle.
Report Writer: Member.MaterialFile.SectionSize
Advanced Selection: SectionSize
Parametric module: SectionSize
Piecemark or System piecemark or User piecemark or Frozen piecemark :
Sequence :
Note this scenario: You change the sequence and other settings on this girt, which shares its piecemark with other girts. If you press " Yes " when prompted " Do you want to change all... ," the changed sequence will apply to this girt only, but the other settings will be applied to all girts with the same piecemark.
Girt rotation: The positive or negative number of degrees of rotation ( 90 to - 90 ) from web vertical. If you are looking along the member workline toward the left end of the member, a positive entry rotates the member counterclockwise that number of degrees.
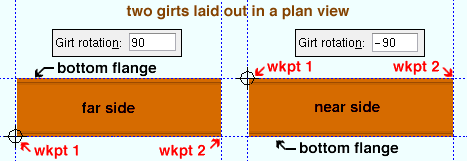
' 0 ' (zero) degrees sets the web of the girt to be vertical.
A ' number between +/-90 degrees ' entered by the user will be applied only if the box for " Hold rotations " is checked. When the box for " Hold rotations " is not checked and a number other than ' 0 ' or ' 90 ' is reported here, then that number is the " Web rotation " for a ' Hip and Valley ' or ' Web Normal ' situation.
' -90 ' sets the web of the girt to be horizontal. The near side of the girt will face toward you in a plan view.
' 90 ' sets the web of the girt to be horizontal. The far side of the girt will be toward you in a plan view.
Report Writer: Member.Rotation
Advanced Selection: Rotation
Parametric module: Rotation
If this box is checked (
), the field " Web rotation " is disabled and the " Girt rotation " is used.
If the box is not checked (
), the rotation is based on the selection made to the " Web rotation " field ( exception: When " Girt rotation " is ' 90 ' that value will apply).
Toe direction: Up or Down . This applies when the " Section size " is a channel or angle.
' Up ' points the leg of the angle (toes of the channel) up in a plan view if the " Girt rotation " is ' 90 ' degrees.
' Down ' points the leg of the angle (toes of the channel) down in a plan view if the " Girt rotation " is ' 90 ' degrees.
Please note: If the " Girt rotation " is ' -90 ' degrees, selecting ' Up ' will point the toe(s) of the angle (or channel) down.
Long leg: Horizontal or Vertical . This applies when the " Section size " is an angle.
' Horizontal ' sets the long leg of the angle to be horizontal if the " Girt rotation " is ' 90 ' or ' -90 ' degrees.
' Vertical ' sets the long leg of the angle to be vertical if the " Girt rotation " is ' 90 ' or ' -90 ' degrees.
Report Writer: Member.Settings.LongLegofAngleIsVertical
Advanced Selection: LongLegOfAngleIsVertical
Parametric module: LongLegOfAngleIsVertical
------------------
![]() or
or ![]() member general information settings:
member general information settings:
| Main material | Model complete (read-only) |
| Marked for processing | Model complete date |
| Marked for detailing | Lift assignment (read-only) |
| Node-match job (read-only) |
------------------
WP to WP length, plan: Read-only . This tells you the work point-to-work point distance (in the primary dimension " Units ") spanned by this girt's work line in a plan view, ignoring elevation. This distance is calculated from the X and Y (but not Z) global coordinates of the girt's work points .
Note: If the girt is sloped out of the plan view elevation, the distance reported here will not be the actual work point-to-work point length, but rather the distance spanned at a single elevation.
Report Writer: Member.WorkpointToWorkpointLevel
Advanced Selection: WorkpointToWorkpointLevel
Parametric module: WorkpointToWorkpointLevel
WP to WP length, actual: read-only . This tells you the actual length of this girt's work line (in the primary dimension " Units "). This distance is calculated from the X and Y and Z global coordinates of the girt's work points .
Note: This distance minus any " Setbacks " that have been applied is the actual length of the girt. The maximum girt length for which you can reliably obtain system connections 80 feet.
Tip: Using Move/Stretch Members or Move/Stretch Members, Include Material to lengthen or shorten this girt or changing the girt's " End elevation " on one end causes a different distance to be reported here.
Report Writer: Member.WorkpointToWorkpointSlope
Advanced Selection: WorkpointToWorkpointSlope
Parametric module: WorkpointToWorkpointSlope
-------------------
| Special Buttons for Detailing this Girt | |||
|
|
|
|
|
| Press this button to open a window with a list of preset views that you can select. When you Detail this girt, each preset view is drawn on the detail. | Press this button to open a list of views you can delete. If this girt has only a main view, you get a warning instead of a list of views since you cannot delete the main view. | This button opens the Annotations... window. Press " OK " on that window to detail this girt. Newly added views will be drawn on the detail. Deleted views will not be drawn. | Press this button to start up the Drawing Editor. You will automatically be shown the detail of this girt if this girt has been detailed and if the file is not currently open. |
The " Detail Member " button is enabled when you are multi-editing girts with different piecemarks, allowing you to Detail those girts. The other buttons will be disabled ( grayed out ) for multi-edit operations, although you can " View detail " if the multiple girts being edited have the same mark.
Note 1: If you add or delete a view or detail a member using these buttons, the " Marked for detailing " button updates immediately.
Note 2: " Freeze drawing " grays out ( disables ) the " Add View " " Delete View " and " Detail Member " buttons.
|
|
| End setting buttons : " Lock End " " Lock All Lockables " " Copy " " Paste " " Save " " Load " |
| Determining a member's left end : |
| Look at the location of its piecemark (B_2). |
|
Look at its reference point ( |
| The left end is related to global coordinates . |
| Left end of a member in a plan view . |
| Left end of members in an elevation view . |
" Copy " and " Save " form buttons remain active.
You are permitted to change only "
Locking a member's end does not inhibit operations that you can normally perform on the member main material, nor does it stop you from applying Custom Properties to the locked connection material.
Status Update: Lock left/right end
Status Display: Approval and modeling > Member end locked
![]() /
/ ![]() " Lock All Lockables" / "Unlock All Lockables "
" Lock All Lockables" / "Unlock All Lockables "
|
sets all "
) particular lockable fields (so that connection design can make entries to that field) or by you yourself making different entries to the locked fields.
![]() " Copy " " Paste " " Save " " Load " buttons.
" Copy " " Paste " " Save " " Load " buttons.
These are sometimes referred to as "form buttons."
You can use these buttons to save and copy connections. The buttons operate on all fields under all leaves that are under the [ Left end settings ] or [ Right end settings ] heading.
For more information, see "Copy" "Paste" "Save" "Load" .
|
|
|||||||||
|
|
||||||||
The following banner notifies you that at least one " End preparations " setting is locked ( ![]() ):
):
| Connection design locks set. |
Connection: N/A (not applicable). connection design cannot design connections on girts.
![]()
|
|
|||||||||
|
|
||||||||
"
If two different " End elevations " are entered, the girt will be sloping. If different " Web rotations " are selected, the girt may be twisted.
To move between the left and right " End elevation ," press the comma key [,] on your keyboard.
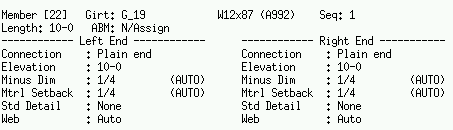
End elevation: The elevation (in the primary dimension " Units " or other units ) of the work point at this end of the girt.
Note 1: " Copy " " Paste " " Save " " Load " buttons do not operate on the " End elevation ."
Note 2: If you are editing one girt with a piecemark shared by at least one other girt and change its " End elevation " on one or both of its ends, you will get a notification dialog after you press " OK " to close this window. The dialog will remind you that you have the option to change the elevations of all girts with the same mark. If you choose to change the elevations of all girts with the same mark, the ends of the members will be moved in the same manner and by the same relative amount (not necessarily to the same elevation).
Report Writer: Member.LeftEnd.LocationZ
Web rotation: Automatic or Web vertical or Hip and valley or Web normal .
Use the " Girt rotation " option instead of this option to set how the girt is rotated around its workline.
Report Writer: Member.LeftEnd.MemberRotationTypeDescription
Standard detail: None or a standard detail name . To apply a standard detail, you can type in the file name of the drawing (if you know it), or press the "file cabinet" browse button ( ![]() ) and double-click any job standard detail or global standard detail that is on the list.
) and double-click any job standard detail or global standard detail that is on the list.
If ' none ' is entered here, then no standard detail will be applied on this end of the girt when this girt is automatically detailed .
If a ' standard detail name ' is entered here, the next time you auto detail this girt, the reference point of the standard detail will align with the input work point on this end of the girt, and the standard detail's bill of material will be combined with the girt's bill of material. The detail is placed on a layer that is named after the standard detail plus a "_L" or "_R" suffix.
Report Writer: Member.LeftEnd.MoreEnd.StandardDetailFileType
Report Writer: Member.LeftEnd.MoreEnd.StandardDetailFileNumber
Report Writer: Member.LeftEnd.MoreEnd.StandardDetailFileName
|
|
|||||||||
|
|
||||||||
Input connection type: Plain end . At this time, connection design does not automatically generate connections on girts.
Report Writer: Member.LeftEnd.MoreEnd.InputConnection.TypeDescription
System designed connection: This is a read-only information field.
At this time, the type of connection reported here will always be ' Plain end '.
Report Writer: Member.LeftEnd.MoreEnd.DesignedConnection.TypeDescription
NM bolt type: N/A (not applicable) at this time. Connection design does not design connections on girts.
NM bolt diameter: N/A (not applicable) at this time. Connection design does not design connections on girts.
Use miscellaneous plates list: N/A (not applicable) at this time. Connection design does not design connections on girts.
Use a safety erection seat: N/A (not applicable) at this time. Connection design does not design connections on girts.
Location of safety erection seat: N/A (not applicable) at this time. Connection design does not design connections on girts.
|
|
|||||||||
|
|
||||||||
Not applicable . At this time, connection design cannot design connections on girts.
|
|
|||||||||
|
|
||||||||
See " Determining left end & near side " if you are unsure which end of this girt is the left end and which is the right.
Field clearance: If this option is selected ( ![]() ), you can enter a distance (in the primary dimension " Units " or other units ). This is the distance from this end of the girt to the face of the member this end of the girt frames to. The distance is measured parallel with the workline of the girt.
), you can enter a distance (in the primary dimension " Units " or other units ). This is the distance from this end of the girt to the face of the member this end of the girt frames to. The distance is measured parallel with the workline of the girt.
Report Writer: Member.LeftEnd.FieldClearanceFlag
Report Writer: Member.LeftEnd.MoreEnd.FieldClearance
Input minus dimension: If this option is selected ( ![]() ), you can enter a distance (in the primary dimension " Units " or other units ). This is the distance from the girt's work point to the nearest edge of the girt. The distance is measured parallel with the workline of the girt.
), you can enter a distance (in the primary dimension " Units " or other units ). This is the distance from the girt's work point to the nearest edge of the girt. The distance is measured parallel with the workline of the girt.
Report Writer: Member.LeftEnd.MoreEnd.MinusDimension
Automatic minus dimension: If this option is selected ( ![]() ), the minus dimension distance is calculated for you. This is the distance from the girt's work point to the nearest edge of the girt. The distance is measured parallel with the workline of the girt.
), the minus dimension distance is calculated for you. This is the distance from the girt's work point to the nearest edge of the girt. The distance is measured parallel with the workline of the girt.
Report Writer: Member.LeftEnd.MoreEnd.Settings.AutoMinusDimension
Connection setback: N/A (not applicable) at this time. Automatic connections on girts are not supported.
Input material setback: If this option is selected ( ![]() ), you can enter a distance (in the primary dimension " Units " or other units ). This is the distance from the work point at this end of the girt to the girt's main material. This distance is measured parallel with the workline of the girt.
), you can enter a distance (in the primary dimension " Units " or other units ). This is the distance from the work point at this end of the girt to the girt's main material. This distance is measured parallel with the workline of the girt.
Report Writer: Member.LeftEnd.MoreEnd.Settings.ConnectionSetback
Automatic material setback: If this option is selected ( ![]() ), the setback distance is calculated for you. This is the distance from the work point at this end of the girt to the girt's main material. This distance is measured parallel with the workline of the girt.
), the setback distance is calculated for you. This is the distance from the work point at this end of the girt to the girt's main material. This distance is measured parallel with the workline of the girt.
Report Writer: Member.LeftEnd.MoreEnd.Settings.AutoMaterialSetback
|
|
|||||||||
|
|
||||||||
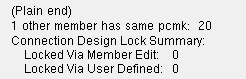
A left- and right-end "
At this time, the only connection type listed for girts in this summary will be " (Plain end) ."
If other girts have been assigned the same piecemark as the one girt you are editing, then the summary will list those other girts by member number . If this girt is part of a group member, the summary shows the group member piecemark .
"
) are reported as " Locked Via Member Edit ."
|
|
|||||||||
|
|
||||||||
|
Similar options appear on the Rolled Section Material window -- however, those options make the main material graphical . Using these "
'.
Top flange operation : ' None ' or ' Cope plain ' or ' Cope field weld #3 (Standard) ' or ' Cope shop weld #3 (Standard) ' or ' Cut flange width ' or ' Cut flange flush ' or ' Clip flange ' or ' Notch ' or ' Notch NS/FS ' or ' Cope field weld #1 (FEMA) ' or ' Cope shop weld #1 (FEMA) ' or ' Clip web ' or ' Seismic cope field weld ' or ' Seismic cope shop weld '.
Bottom flange operation : Same as above.
"Properties" opens the Edit Properties window, on which you can make entries to custom properties . If, at the time it was created, your current Job was set to use a legacy flavor, the window that opens is named Custom Properties , not Edit Properties .
The Edit Properties window can also be used to read "
Tip: Model > Member > Properties is an alternative to this button. It opens the Edit Properties window directly, without your first having to open a member edit window.
" Status " opens the Status Review window, which can give you additional information about this girt, and which you can use to enter status information or designate a member as an existing member .
Note: This button is orange if one or more " Repeat " check boxes on the Member Status Review window do not match the checked-unchecked state of same-named fields in User and Site Options > Site > " Items to Copy/Repeat ." On the Status Review window, the fields that do not match User and Site Options are printed in red .
" OK " (or the Enter key) closes the Girt (Legacy) Edit window and saves any changes you have made. When you Process and Create Solids , the member is regenerated in solids form per to the settings you have entered.
Solids on "OK": If the appropriate choice is made to User and Site Options > Modeling > " Automatically process after modeling operation ," then this member will automatically be regenerated ( Create Solids will take place) after your press " OK ." Otherwise, you will have to manually Process and Create Solids in order for changes you made on this window to be fully updated in the 3D model.
Change all: If you Edit Member (one girt only) and make a change that potentially triggers the " Do you want to change all ... " dialog and the 3D model contains more than one girt that has the same piecemark as the girt you changed, a yes-no dialog opens. On it is the question, " Do you want to change all (members with this piecemark). " Press the " Yes " button to change all the members; press the " No " button to change only this girt. Special cases are listed on the table below:
| Do not trigger change all ... | Not changed with change all ... |
| " Sequence " | " Sequence " |
| " Piecemark " | " Model complete date " |
| " Member category " | Example: " Yes " or " No " on the dialog changes the " Sequence " of this member (1 girt) only. |
| " Member description " | |
| " Member routes " | |
| " Model complete date " |
Defaults for to-be-added girts: If you are adding a new girt and you press " OK ," the settings on this window become the default settings for the next girt you Add in this session of Modeling . Even if all you do is double-click a girt and press " OK " without making any changes on this window, this window's settings become the defaults for the next-added girt. On the other hand, the settings on this window do not become the defaults for new girts if you are editing multiple piecemarks or if you press " Cancel " to close this window.
" Cancel " (or the Esc key or the ![]() button) closes the Girt (Legacy) Edit window without saving any changes that you have made to the window. " Cancel " does not undo a " Detail Member " operation.
button) closes the Girt (Legacy) Edit window without saving any changes that you have made to the window. " Cancel " does not undo a " Detail Member " operation.
Note: If you have opened this window using Add Girt , pressing " Cancel " brings you back to the work point location step of adding a girt.
Tip: Any time you Edit Member just to review a member (and you do not want to set the defaults for to-be-added members), the best way to close this window is to press " Cancel. "
" Reset " undoes any changes that you made since you originally opened this window.
Exception: " Reset " does not undo a " Detail Member " operation.
"Design Calc" outputs a report that includes this girt's general settings and left/right end settings. If you are editing multiple girt with the same piecemark (or different piecemarks), you get a report for each girt. Each report is output to the destination specified per User and Site Options > Output > " Reports ."
Tip: To get a report that is similar to this, but includes information on multiple members, output a Check Report .
"Expanded Calc" outputs the Expanded Connection Design Calculations . Output is to your web browser.
Expanded Connection Design Calculations on a girt are fairly limited since only ' Plain end ' connections can be applied to girts. Certain browser requirements must be met in order for you to access this report.
If you are editing multiple girts with the same piecemark (or different piecemarks), you get a report for each girt.

